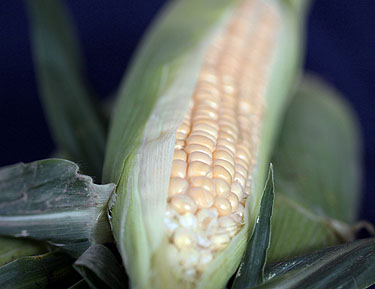
 A few weeks ago, Kamran of The Sophisticated Gourmet
mentioned (via Twitter) that he would like to see a comparison of the same photos taken by a digital SLR and a point and shoot camera. I thought it was a fascinating idea, so I filed it away, making a note that I wanted to give it a try.
Disclaimer – Please Read…
Before I get into the details of my photography adventure, let me remind everyone that I am in no way a professional photographer, nor do I play one on TV. If you’re looking for a post about how to take the perfect photograph, I’m afraid you’ll have to look elsewhere. My intention with this post is not really to give photography advice. Instead, I am simply giving you a behind-the-scenes glance at some of the techniques I have used for my photos. To do that, I will compare photos taken by both my digital SLR and point and shoot cameras.
Please note that I am not adding this disclaimer because I want to avoid harsh criticism. Quite the opposite, actually – I am welcoming it! Please feel free to comment and let me know what you think I’m doing wrong. That’s how I learn… I credit most of my photography success to this point to my many (many) rejections from FoodGawker and TasteSpotting!
The Cameras…
Now that we’re all on the same page, let me introduce you to my two cameras…
DSLR – Canon EOS 50D (15.1 megapixel) with a Sigma 50mm F2.8 EX DG macro lens
Point and Shoot – Sony Cybershot (7.2 megapixel)
Join me for some milk and cookies…
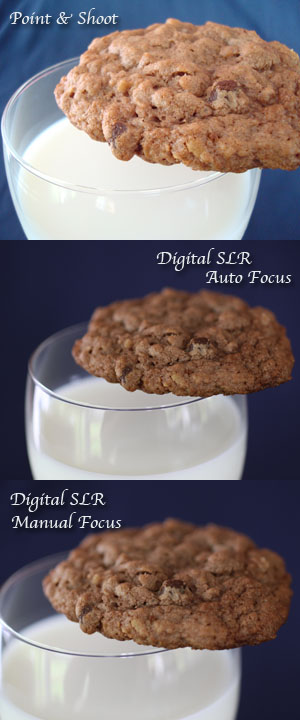
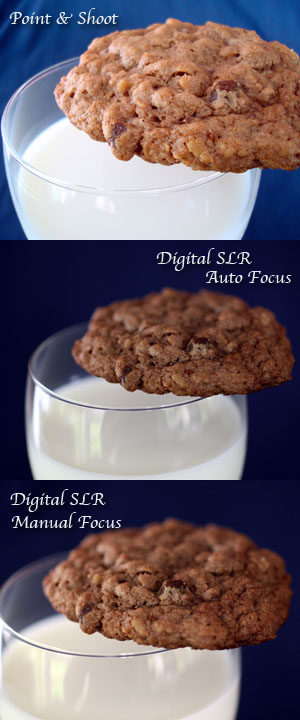
My first set of photos features the Nutty Nutella Oatmeal Chip Cookies that I made earlier in the week. I wasn’t thrilled with my original pictures of the cookies, so I decided to take some more. For these pictures, I started with a large cardboard box and a piece of dark blue fabric. The fabric was draped over the box to create a backdrop for the photos. I was shooting in the afternoon in my sunroom with the white blinds closed to avoid too much glare/direct light (although you can see that I still did get some glare on the glass). The cookie was sitting on a wine glass/tumbler filled with milk. I prefer my cookies and milk in fancy glassware, thank you very much!
I struggled to get the exact same photo with the two cameras because the aspect ratio on the photos is different between the two cameras. I did my best to crop the photos to try to get similar pictures. The pictures on the left-hand side have no post-procesing (except cropping and adding text) and the pictures on the right were processed using Photoshop CS4. My Photoshop abilities are basically limited to adjusting tone, brightness/contrast, levels, and hue/saturation. I am working on learning more, but that takes time and practice.
Personally, I like the DSLR pictures more than the point and shoot pictures. I had some difficulty getting the exposure/colors to come out the way I wanted using my point and shoot. I am not necessarily blaming the camera since I was not real familiar with how to change all of the settings. I attempted using the soft snap setting on the point and shoot, which is the closest approximation I could find for the Aperture Value (f/2.8) setting that I used on the DSLR. Even though I reduced the exposure value on the point and shoot, the milk was over-exposed in each picture (you’re looking at the best one I could find). I could not find another way to adjust the aperture value on the point and shoot to achieve the nice blurred background, so you can see the fabric.
Alright… How am I doing so far?
Inspiration from my CSA…
After struggling with the exposure on the point and shoot camera when attempting to photograph the glass of milk, I decided to try another subject. I had just picked up our CSA share for the week, so I decided to photograph a few ears of corn. I used my blue fabric backdrop again, with the same lighting as the milk and cookies shot.

The photos above were taken using the DSLR. I did some very minimal processing and cropping in Photoshop. This time, I used the automatic setting on the camera with no flash. Even though I wasn’t specifically setting the aperture value, the background still appeared more softened on the pictures than it did with the point and shoot pictures.
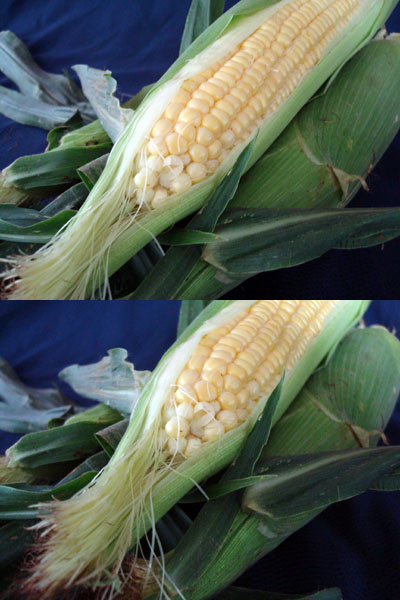
Compared to my milk and cookie pictures, I was much happier with the pictures of the corn from the point and shoot camera. I continued to use the soft snap setting on the camera with no flash. I still had to reduce the exposure to keep the corn kernels from being over exposed, but I felt that my efforts were successful this time around. I did try various other settings on the camera in an attempt to get the corn kernels to be in focus and the edges of the picture and background to soften and blur a bit, but I didn’t really have much luck. If anyone knows how to do that with the Cybershot, I’d be curious to know how you do it!
Playing with Manual Focus…
While I struggled a bit with the exposure and settings, I think the most frustrating part of shooting with the point and shoot camera was that I lost the ability to focus my camera manually. While I don’t do it all of the time, the ability to turn off the auto-focus on my lens is an option that I like to have. I find it especially helpful when I am photographing something with various depths and I want to focus on one of the inner levels of the picture (focusing on soup in a bowl, for example). I also find that the auto-focus often focuses on the center of the picture, and there are times when I want to focus to be elsewhere in the picture (typically somewhere in the bottom third of the photo).
To demonstrate, I decided to take a few more pictures of the corn, focusing on various areas of the corn cob. While they aren’t fantastic pictures, I think they demonstrate my point…
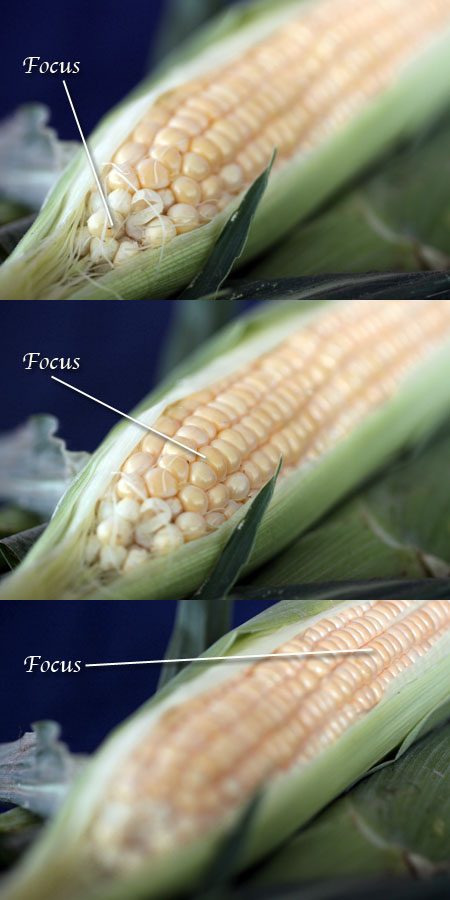
As you can probably tell, I am a big fan of having one part of the photo in clear focus with other areas of the photo softened/blurred a bit. I know that there are ways to achieve the same effect in Photoshop and other photo processing software, but I typically prefer to do as little post-processing as possible. I’m much more comfortable with the camera than I am with Photoshop!
Final Thoughts…
As you may have guessed, given the choice between my two cameras, I almost always choose the DSLR. I still appreciate having the point and shoot for situations where I don’t want to carry the DSLR and just want to be able to snap some quick pictures here and there. When I am photographing food, though, it’s the DSLR all the way. I am pretty sure, though, that my love of my DSLR is partially due to the fact that it makes me look good with minimal effort. It is easy to adjust the settings as I work, and I like having the ability to manually focus my pictures.
So, do I think that it is impossible to take good pictures with a point and shoot camera? Absolutely not. I think my difficulties with mine are more a result of the fact that I don’t know how to use all of the settings on the camera (and the fact that I don’t like having to click through all of the menus). I’m sure many of you could have picked up my camera and gotten much better pictures than I did.
Feedback…
Now that I have shared my photography adventures with you, I’d love to hear what you think! What did I do right (if anything), and more importantly, what did I do wrong? What are your go-to settings when you are taking photographs? Do you have any favorite props or lighting techniques?

This is a very informative post. Great examples!
I can see the differences. And I agree with what you’ve written, about the freedom the SLR gives you vs. P&S.
I just got my SLR so I need a little time for comparisons. :)
I’m happy you took up Kamran’s idea.
Thanks for showing us the difference. Great tip about the cardboard box and the fabric. One of these days I’ll buy a macro lens. I use a point and shoot at restaurants and I use a Canon dSLR for taking food photos at home.
Great post Jen. How wonderful of you to take the time to try to explain all the intricasies of digital photography. I’m photography impaired, obviously, because I base my opinion on what I like to see, which is almost always different from what photography “specialists” dictate to be the acceptable. I do get that by blurring a part of your photo, you draw attention to another part, but so many times I see such extremes that it leaves me scratching my head. And it particularly frustrates me as it relates to having photos accepted at our favorite food porn sites (which shall remain nameless, of course…lol) I’m just saying that it’s difficult for me to work with my own photos when I don’t share the same likes as those who are judging me, if that makes any sense. It’s like trying to cook liver for someone who hates liver. Even if it’s the best liver since Adam and Eve (well, that’s ribs, I realize) if the person who’s judging hates liver, you’ll get turned down every time. I didn’t mean to write a novel on your blog, but just needed to vent, I suppose. Your blog has always been an inspiration to me.
Jen, this is interesting. When you mentioned that you’re doing a comparison from Karman’s idea, I hope that you would go first. That’s very detailed explanations of your experience with both cameras. We also share the same opinion about a few things. When it comes to post processing, I only know the basics (brightness/contrast; hue/saturation; tone). I also prefer the dSLR as it’s easier for me to take photos withe minimal effort. I also agree that you can even take photos with a P&S camera. But just like you, I don’t use all the setting on the menu as well as clicking through each one of them. :)
I think you did pretty good with P&S. Actually, in my opinion, the the cookies and milk taken with the P&S is the best among the three. Also the corn with the P&S is also great even without the depth of field.
I honestly don’t have anything to say that there’s something wrong with your pictures. It’s just because I’m not a professional or even an amateur photographer. But the photos are well presented.
Thank you so much for this post.
I’ve always preferred my SLR and DSLR, but I do keep my S&P for such occasion when I can’t have the first two. Though, that being said, I’m an amateur photographer, so It quite clear what my preference would be right off the bat.
I do like the comaprisons you’ve made though. Awesome post.
I’m relatively new to my DSLR but am really enjoying using it and the difference between that and the P&S cameras is amazing. Manual focus is something I’m just really starting to use now that I’ve got my head round aperture, shutter speed and exposure.
Jeff – Glad you enjoyed the post!
Aparna – Hope you are enjoying your SLR… I look forward to seeing your comparison pics!
Hummingbird Appetite – Glad my box/fabric tip helps you out. I agree, it is much easier to get away with the P&S at restaurants!
Mags – I’m glad you liked the post, and even MORE glad that you left such a detailed comment! While I appreciate when others leave comments letting me know that they enjoy my pictures, I was really hoping that this post would spark some discussion! I think that photography is very subjective, and you are right that it is hard to get pictures accepted on certain sites if your idea of a good photograph is different than theirs! On the other hand, I think there are some photography basics that I still need to work on, and there are times when I am happy about my rejection photos because they point out something that I didn’t see myself!
Divina – You’re proving my point about photography being so subjective mentioning that you prefer the P&S version of the cookie pictures! Thanks for commenting, and I look forward to your comparison post!
Jenn – I have preferred SLR/DSLR since I took my first photography class in high school, so I am with you. I originally intended to try to prove to myself that I could take equally good pictures with my P&S, but unfortunately I didn’t feel that I was successful with that… I tried really hard but couldn’t get the results I wanted when I wasn’t using the DSLR.
George – Hope you enjoy your DSLR… There are so many settings on the camera (at least there are on mine!) that it takes a very long time to learn them all, and I am nowhere close!
Great post Jen! Loads of detail and info for other amateur photogs out there.
I don’t have the same P & S as you, but to achieve bokeh (blurred background) I would use the macro setting on mine (Nikon Coolpix S550). That usually gives you a somewhat desirable effect, although nothing close to my dSLR.
Very neat to see the differences between the cameras and the various shots! I think I need a new camera. But Photoshop is still my best friend :)
Wonderful explination of depth of field and where focus points work. Great find.
great post on the two. we definitely prefer the dslr.. and shoot mainly in aperture priority. agree w/ natasha–photoshop is for us, photographer’s bestfriend.
Jen, OMG! I love this post. Thank you so much for taking the time for doing it and for keeping me in mind! :D The photos are beautiful and I meticulous you were with sharing the details. I find all of your photography to be amazing, so if anyone says otherwise (and can’t take a photo for their life)- then they need to go stuff a chicken.
Lovely post (I think this will definitely have to be in my Sunday Favs this weekend!)
I enjoyed this post but I don’t have anything more to offer you. I use a point and shoot and don’t have photo shop. I point and shoot and pray! Haha. Your pictures always look great!
Thank you for this post; it was very good. I’m glad you compared the output of the two types of cameras. I understand why Divina prefers the P&S photo of the cookies. I think it deals with the lighting. If you were to lighten the DSLR photos a bit more, they would look even better. They are darker than P&S photos. Either way, the cookies (and corn) look great in all of the shots.
I love this post. It’s always interesting to see the differences in each frame when you shoot the same object. I still think there’s more potential with the DSLR photos than the Point and Shoot though. There’s so much more depth, you’re able to play around with it more in photoshop to give it the maximum potential. I’m with Natasha and Ravenouscouple on that one :P
And I also prefer manual focus, esp. for food shots. With a tripod. It gives you more control for your shot.
And in post-processing in photoshop, it matters which tools you use first, second, third etc. I use Levels first, followed by contrast/brightness, then either hue/saturation or color balance. That’s just my opinion though, everyone has their own methods.
Anyway, great post, thanks for taking the time in showing us your tricks :)
Lovely post & ever so informative. As usual, I need to spend more time learning the nuances of the camera…and also need to dust the cobwebs off the tripod. Thank you for making this huge effort!
Great post! I just received a DSLR for my graduation gift but have yet to fully understand how to use all of it’s features. I know I want to buy a micro lens so I’m saving up for that currently. Thanks for explaining how you do things, its’ always helpful to learn new tips:)
Thanks for posting this. I am currently struggling with the decision to buy a DSLR (when I have, you know, PhD fees to be paid…) – I think I really really want one but I also think that my Lumix TZ3 does a pretty good job for a P+S, for now, at least – maybe when I become a famous food blogger I might need a DSLR – mwahahahaha! – but for now I guess I have ot content myself with my Lumix and live vicariously through others.. :-) great post…
Elizabeth – Thanks for the tip! I tried the macro setting on mine, but I think I need to work on it some more.
Natasha – Yes, Photoshop can be very helpful. I need to learn some more about Photoshop so that I can really take full advantage of it!
Andrew – Thanks for stopping by. Glad you liked the post!
ravenouscouple – Yes, I definitely prefer my DSLR, too. Still need to learn some more photoshop tricks.
Kamran – Thanks for the inspiration on this one… Glad you liked it!
Reeni – Thanks… I think there is a lot to be said for not using photoshop to fix and correct. I think it forces you to take better pics! Yours always look great.
Memoria – Yes, I imagine the lighting on the cookies is the reason that the point and shoot pics were preferred. Thanks for your input.
Candy – Thanks for joining in the conversation… I always love your photography posts! Thanks for the hint on the order of adjustments in Photoshop! I will keep that in mind.
Deeba – I, too, need to use my tripod more. I tend to be lazy and skip it, but my pictures always suffer.
Nutmeg Nanny – I’m sure you’ll love your DSLR… I’ve been happy with my lens, and it wasn’t too expensive. I look forward to all of your pics as you learn more about your camera!
eatlivetravelwrite – I struggled with the decision to buy my DSLR… It’s definitely not all the camera, though – and you get great pics with your point and shoot. With all of the editing software, there are lots of ways to jazz up your pics, too!
Photoshop – sounds like you have a good handle on correction tools, even if you might not think so. ;-).
There’s one more vital tool for your Photoshop arsenal, and it’s always the final step you take: sharpening. I still use Unsharp Mask because I’m too lazy to play with the Smart Sharpen features. Smart Sharpen offers many, many more options than Unsharp Mask and thus more control, but I’ve been using Unsharp Mask for years so I’m comfy with it.
My default Unsharp Mask setting is 85%, 0.8 radius, and 3 threshold. This works really well for images from my Canon point and click. Play with the settings to find ones comfortable for you.
Give it a shot and notice how well-defined it makes your images.
Interesting article. I like my point and shoot but its sort of a hybrid. With a little skill, you can get a more professional photo. I’m good with the styling, my husband more technical. I always say together we make a good photographer.
Thanks Jen for this awesome post. I’ve been debating (mostly with myself) about buying a dSLR. I know I will get much better photos, but I am still not sure if I am willing to spend the big bucks because my point and shoot is my best friend. The comparative photos really help. Thanks, again.